> ## Documentation Index
> Fetch the complete documentation index at: https://docs.scripe.io/llms.txt
> Use this file to discover all available pages before exploring further.
# Post Editor
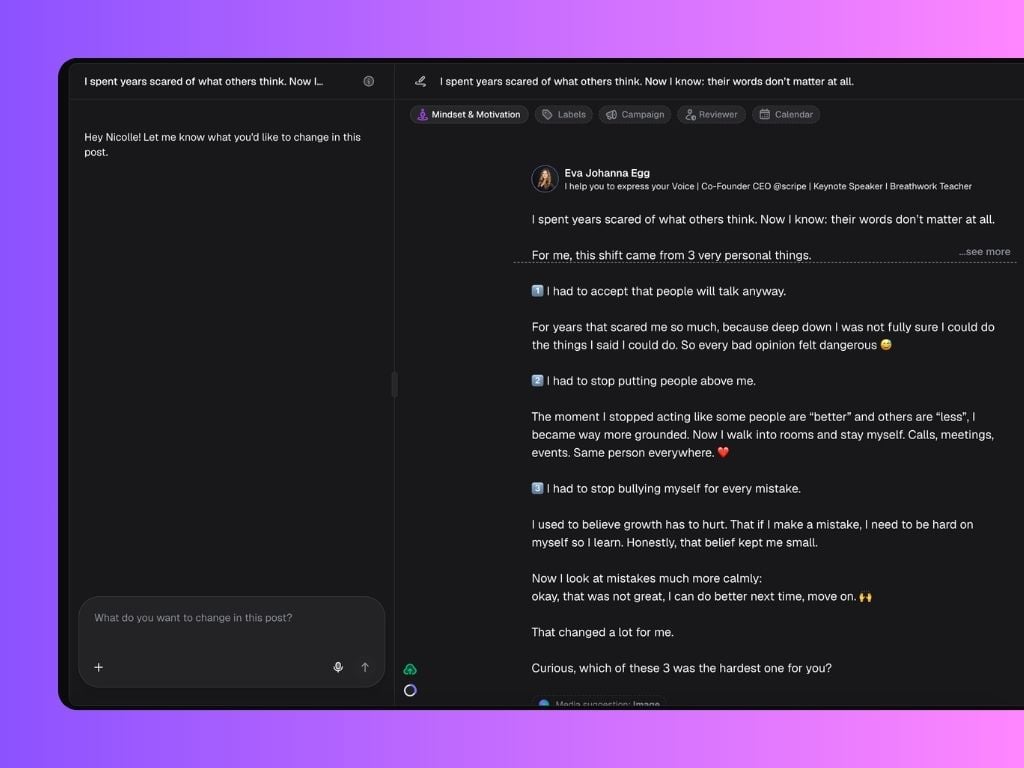
The Post Editor is where you refine, review, and schedule your content before publishing it to LinkedIn.
It combines AI-assisted editing, formatting tools, collaboration features, and scheduling in one place, so you can go from draft to published post without leaving Scripe.
 ## Editing Text
* Simply click into the text area to start writing or editing your post.
* Standard text editing features are available, including:
* **Bold**, **Italic**, and **Underline** formatting
* **Bullet points** or **numbered lists**
* Quick access to editing options with the toolbar that appears when you select text.
## Editing Text
* Simply click into the text area to start writing or editing your post.
* Standard text editing features are available, including:
* **Bold**, **Italic**, and **Underline** formatting
* **Bullet points** or **numbered lists**
* Quick access to editing options with the toolbar that appears when you select text.
 ## **Continue the conversation in the chat**
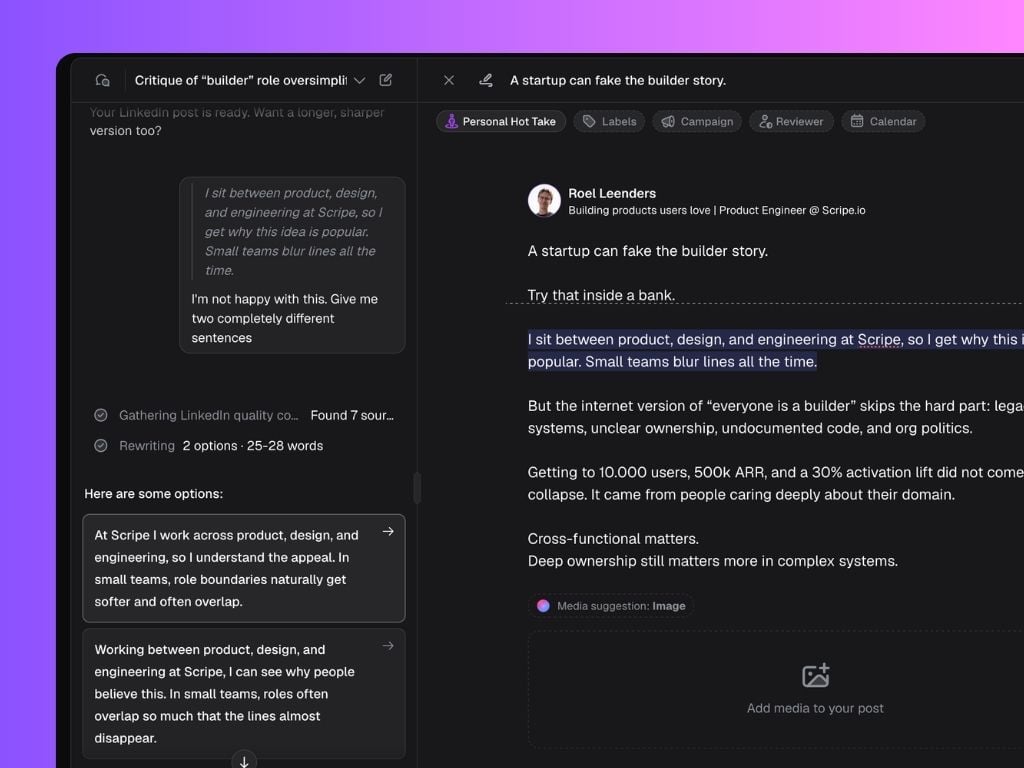
When you open a post, the chat on the left side continues the conversation you were already having while creating the draft.
This means you don’t need to start over or explain the context again. Simply tell Scripe what you’d like to change, and it will update the post based on the conversation history.
If you didn’t use the chat to create your draft, you can start a new conversation at any time and tell Scripe how you’d like to improve the post.
You can ask things like:
* Make the hook stronger
* Add a personal example
* Shorten the post
* Change the tone
* Rewrite specific sections
Scripe will suggest updated versions based on your instructions, and you can choose whether to apply those changes to your post.
## **Improve selected text with the chat**
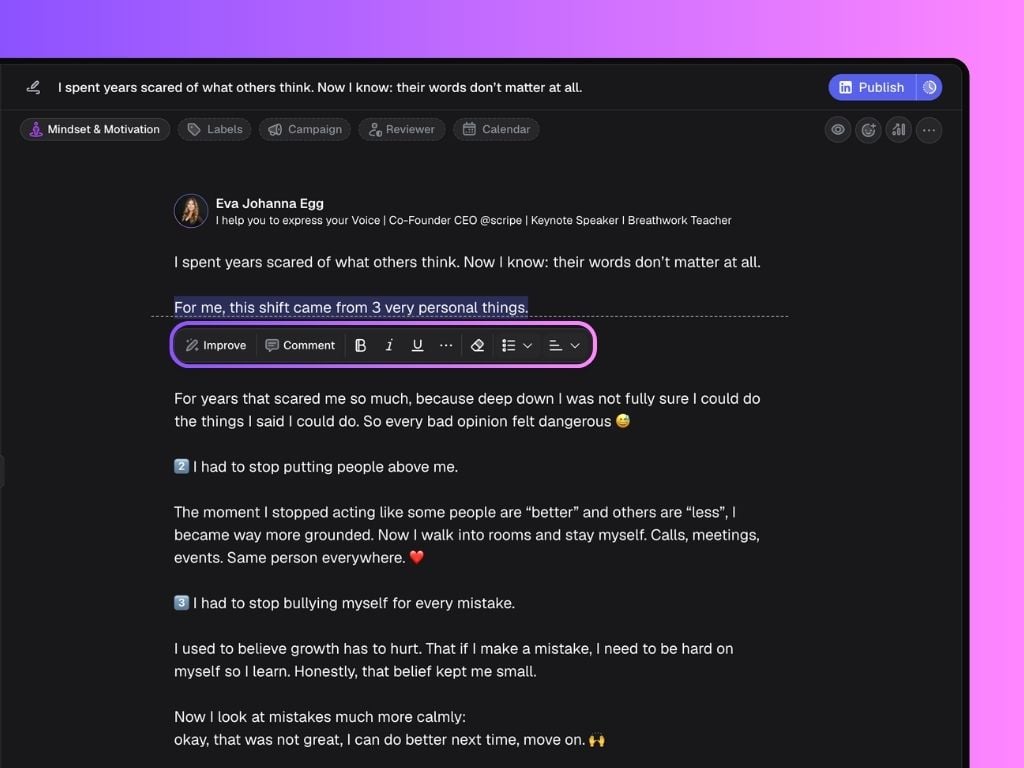
Highlight any section of your post and click **Improve**.
You can either:
* Enter your own editing instruction
* Use one of the quick actions
This is useful when only a specific section needs refinement without changing the rest of the post. The improvement suggestion appears in the chat and you can opt to apply it or not.
## **Continue the conversation in the chat**
When you open a post, the chat on the left side continues the conversation you were already having while creating the draft.
This means you don’t need to start over or explain the context again. Simply tell Scripe what you’d like to change, and it will update the post based on the conversation history.
If you didn’t use the chat to create your draft, you can start a new conversation at any time and tell Scripe how you’d like to improve the post.
You can ask things like:
* Make the hook stronger
* Add a personal example
* Shorten the post
* Change the tone
* Rewrite specific sections
Scripe will suggest updated versions based on your instructions, and you can choose whether to apply those changes to your post.
## **Improve selected text with the chat**
Highlight any section of your post and click **Improve**.
You can either:
* Enter your own editing instruction
* Use one of the quick actions
This is useful when only a specific section needs refinement without changing the rest of the post. The improvement suggestion appears in the chat and you can opt to apply it or not.
 ## Using Mentions
In the Scripe Post Editor, you can tag companies directly in your LinkedIn posts by using mentions.
* Type **@** followed by the company’s name.
* A dropdown will appear showing matching companies.
* Select the correct company from the list to insert the mention
**Tagging personal LinkedIn profiles is now supported** but the results are **limited**.
## Adding Emojis
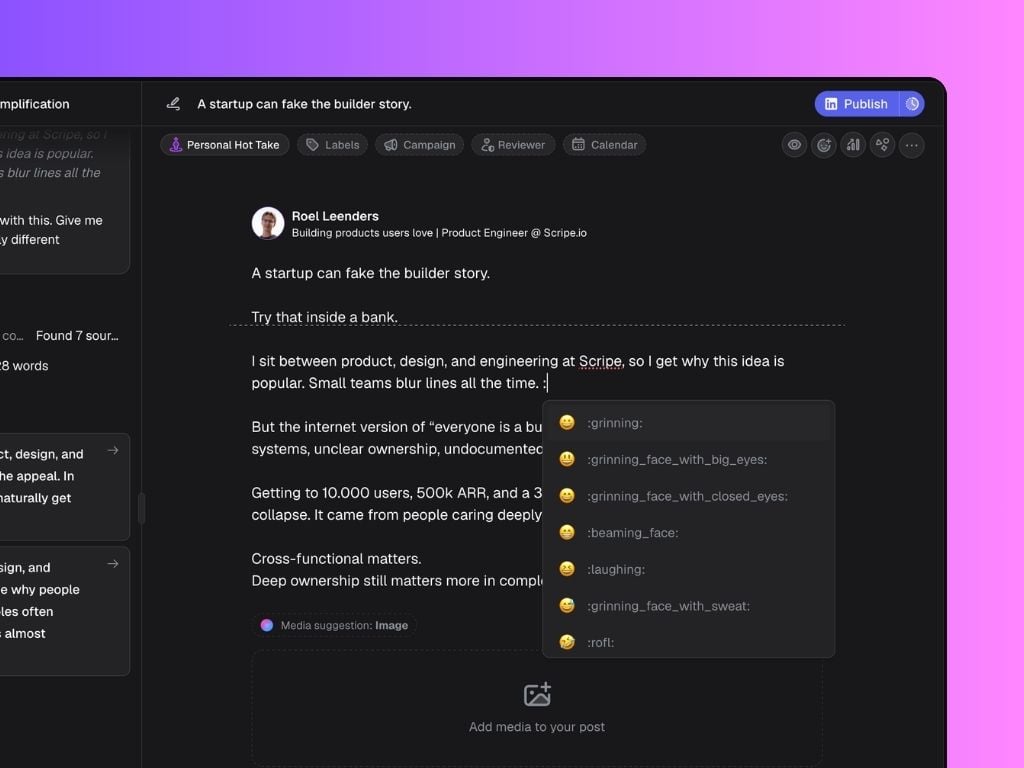
You can easily add emojis to your post inside the Scripe Editor to make your content more engaging and visually appealing.
* Click on the **emoji face icon** located in the editor toolbar or type `:` to add an emoji as you would in Slack or Notion, for example.
* Browse or search for the emoji you want.
* Click on the emoji to insert it directly into your post.
## Using Mentions
In the Scripe Post Editor, you can tag companies directly in your LinkedIn posts by using mentions.
* Type **@** followed by the company’s name.
* A dropdown will appear showing matching companies.
* Select the correct company from the list to insert the mention
**Tagging personal LinkedIn profiles is now supported** but the results are **limited**.
## Adding Emojis
You can easily add emojis to your post inside the Scripe Editor to make your content more engaging and visually appealing.
* Click on the **emoji face icon** located in the editor toolbar or type `:` to add an emoji as you would in Slack or Notion, for example.
* Browse or search for the emoji you want.
* Click on the emoji to insert it directly into your post.
 ## Copy a Post to Clipboard
If you want to publish your post manually without scheduling through Scripe, you can quickly copy it without manually selecting the text.
* Click on the **three dots (···)** at the editor toolbar.
* Select **Copy to Clipboard**.
* Your entire post will be instantly copied, ready to paste wherever you need (like directly into LinkedIn).
## Adding and Managing Comments
The **Comment** feature in the Scripe Post Editor allows you to leave feedback, notes, or suggestions directly on specific parts of your post — ideal for solo editing or team collaboration.
### How to Add a Comment
1. **Highlight** the text you want to comment on.
2. Click **Comment** from the quick action menu.
3. Type your feedback or note in the comment box that appears.
## Copy a Post to Clipboard
If you want to publish your post manually without scheduling through Scripe, you can quickly copy it without manually selecting the text.
* Click on the **three dots (···)** at the editor toolbar.
* Select **Copy to Clipboard**.
* Your entire post will be instantly copied, ready to paste wherever you need (like directly into LinkedIn).
## Adding and Managing Comments
The **Comment** feature in the Scripe Post Editor allows you to leave feedback, notes, or suggestions directly on specific parts of your post — ideal for solo editing or team collaboration.
### How to Add a Comment
1. **Highlight** the text you want to comment on.
2. Click **Comment** from the quick action menu.
3. Type your feedback or note in the comment box that appears.
 ### How to View and Manage Comments
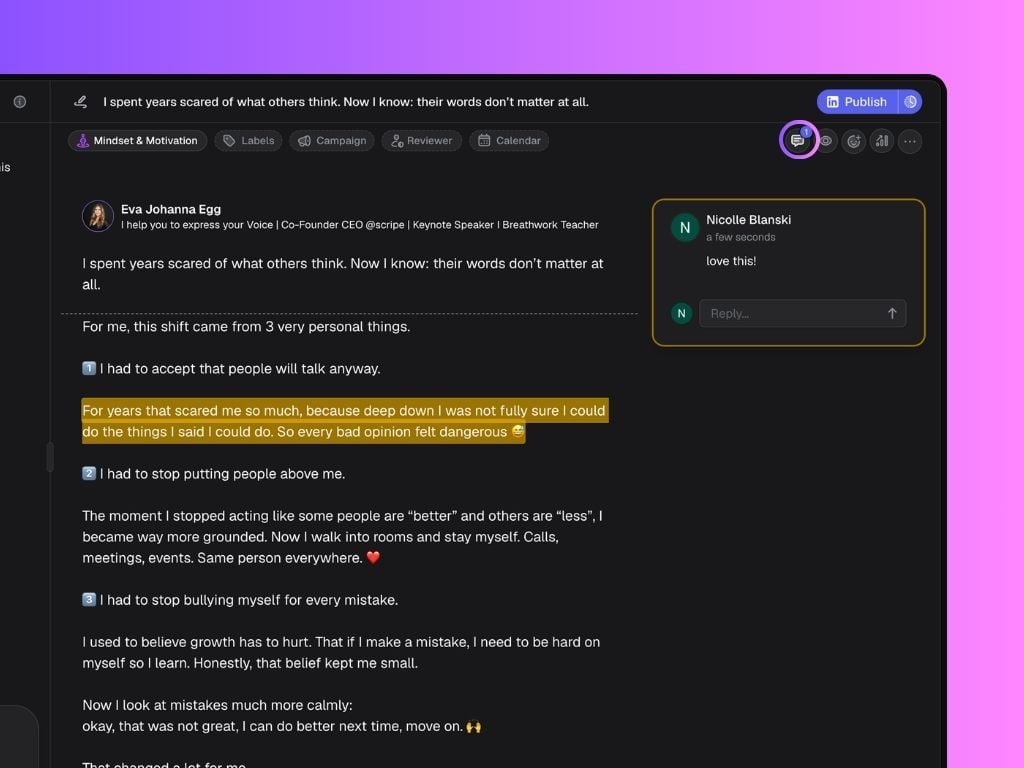
* To view all comments on a post, click the **speech bubble icon** with a number at the top right of the editor.
* This will open a panel where you can see every active comment and reply to them if needed.
If you click Resolve on a comment, it will be permanently deleted. Only click Resolve when the comment has been fully addressed, as it cannot be undone.
### Best Uses for Comments
* Leave reminders for edits or improvements.
* Ask questions or suggest changes when collaborating.
* Keep track of feedback during drafting and revision.
**Note:** Comments are internal only and will not appear in your final published post.
## Requesting a Review
If you're on Scripe's Advanced or Business plans, you can request a teammate to review your draft before publishing.
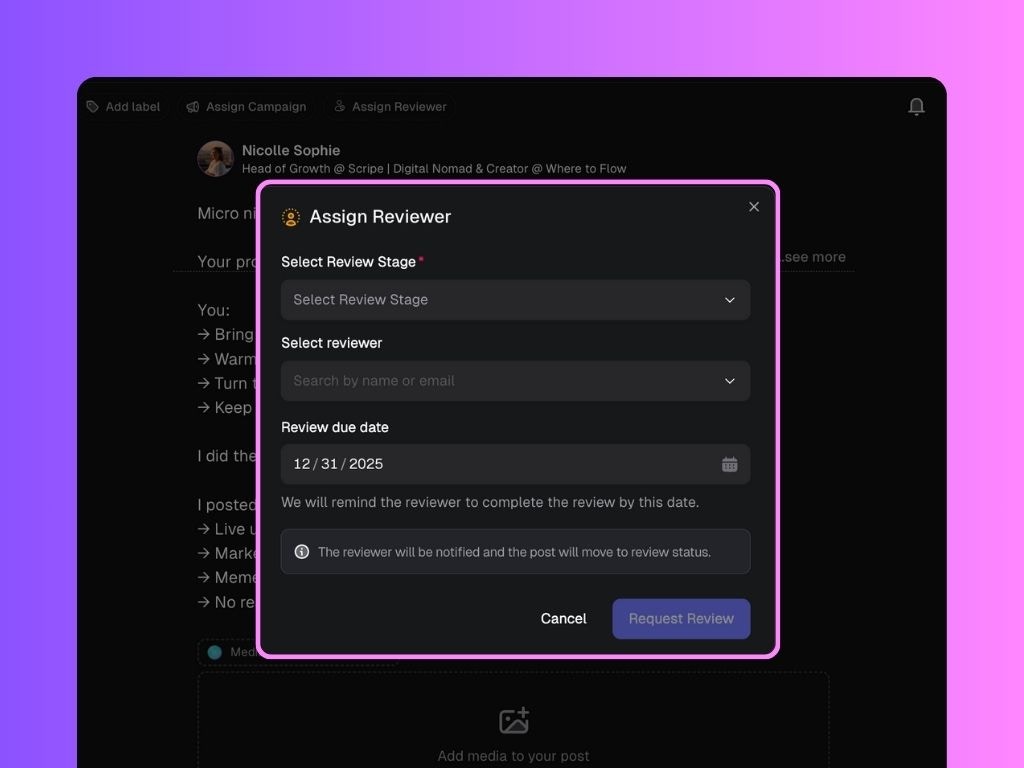
* Click on **Assign Reviewer** on the editor toolbar.
* Pick a **Review Stage** and **select the reviewer** from the dropdown list.
* Set a **Review Due Date** by picking a deadline from the calendar.
* Click **Request Review** to send the review request.
The assigned reviewer will receive a notification both on their Scripe Inbox and via email, to complete the review by the selected due date.
### How to View and Manage Comments
* To view all comments on a post, click the **speech bubble icon** with a number at the top right of the editor.
* This will open a panel where you can see every active comment and reply to them if needed.
If you click Resolve on a comment, it will be permanently deleted. Only click Resolve when the comment has been fully addressed, as it cannot be undone.
### Best Uses for Comments
* Leave reminders for edits or improvements.
* Ask questions or suggest changes when collaborating.
* Keep track of feedback during drafting and revision.
**Note:** Comments are internal only and will not appear in your final published post.
## Requesting a Review
If you're on Scripe's Advanced or Business plans, you can request a teammate to review your draft before publishing.
* Click on **Assign Reviewer** on the editor toolbar.
* Pick a **Review Stage** and **select the reviewer** from the dropdown list.
* Set a **Review Due Date** by picking a deadline from the calendar.
* Click **Request Review** to send the review request.
The assigned reviewer will receive a notification both on their Scripe Inbox and via email, to complete the review by the selected due date.
 ## Managing Post Notifications
You can also control notifications for individual posts using the three dots (···) on the top right corner of the editor and clicking on **Subscribe/Unsubscribe to updates**.
This is helpful if you want or no longer want to receive notifications about changes, comments, or review updates for a particular draft.
## Delete a Post
You can delete a draft post directly from the editor if you no longer need it.
* Click on the **three dots (···)** on the editor toolbar.
* Select **Delete**.
* Confirm the action to permanently remove the post from your workspace.
Deleting a post is permanent and cannot be undone.
## Extra Tools Sidebar & Top Bar
On the right-hand side of the editor, you’ll find tools that help you create, refine, and enrich your post:
* **Preview**: Choose between **Desktop view** and **Mobile view** to see how your post will appear on different devices.
* **Stats:** Get a quick overview of how your post is expected to perform before publishing.
The top bar gives you quick access to controls that help you format and organize your content:
* **Post Format:** You can update your post format at any time.
* **Add a Label:** Create your own labels via Settings to categorise your posts.
* **Assign Campaign:** Create your own campaigns on the worskpace and add your posts to them.
* **Assign Reviewer:** Request a teammate to review your draft before publishing.
**Tip:** Click the post title to rename it to something recognizable for you, this won’t affect the published post.
## Managing Post Notifications
You can also control notifications for individual posts using the three dots (···) on the top right corner of the editor and clicking on **Subscribe/Unsubscribe to updates**.
This is helpful if you want or no longer want to receive notifications about changes, comments, or review updates for a particular draft.
## Delete a Post
You can delete a draft post directly from the editor if you no longer need it.
* Click on the **three dots (···)** on the editor toolbar.
* Select **Delete**.
* Confirm the action to permanently remove the post from your workspace.
Deleting a post is permanent and cannot be undone.
## Extra Tools Sidebar & Top Bar
On the right-hand side of the editor, you’ll find tools that help you create, refine, and enrich your post:
* **Preview**: Choose between **Desktop view** and **Mobile view** to see how your post will appear on different devices.
* **Stats:** Get a quick overview of how your post is expected to perform before publishing.
The top bar gives you quick access to controls that help you format and organize your content:
* **Post Format:** You can update your post format at any time.
* **Add a Label:** Create your own labels via Settings to categorise your posts.
* **Assign Campaign:** Create your own campaigns on the worskpace and add your posts to them.
* **Assign Reviewer:** Request a teammate to review your draft before publishing.
**Tip:** Click the post title to rename it to something recognizable for you, this won’t affect the published post.